Short link for this page: utwente.nl/studentmail.
This page explains the email settings for students (*@student.utwente.nl addresses).
Quick e-mail access
Start Outlook on your smartphone or computer (if already installed) and enter your UT e-mail address (Microsoft Exchange) to add your mailbox. For details, see the manuals below. Alternatively, you can access your mailbox in your browser: go to outlook.office.com and enter your UT e-mail address to log in.
Manuals
- This manual uses a consistent writing style: references to text and buttons on screens are printed in italics, and information that you have to enter yourself is printed in bold.
- This manual is written for Outlook, part of Office 365. Please download the application first:
- For computer (Windows or Mac): office.com
- For Android: download the Outlook app from Google Play
- For iPhone/iPad: download the Outlook app from app store
Add your UT email account in Outlook (computer or Outlook smartphone app) - Start Outlook. If you cannot find the shortcut you can quickly find it by clicking on the start button and search with the term Outlook.
- A welcome screen should be displayed. Enter UT e-mail address and click on the connect button:
- A Choose account type selection een will be displayed. Click on the Office 365 button.
- An Account setup is complete message should be displayed. Uncheck the Set up Outlook Mobile on my phone, too option and click on the OK button.
- A Windows security popup will appear. Please enter in the username field your (UT) e-mail address and below your password. Select the "Remember my credentials" option and click on the OK button.
Add your UT email account in Thunderbird Download, install and setup Thunderbird
- Download and install Thunderbird from: https://www.thunderbird.net/.
- Enter your name, UT e-mail address and password and click Configure manually.
- Enter the mail server settings:
| Incoming | Outgoing |
Protocol | IMAP | SMTP |
Server | outlook.office365.com | smtp.office365.com |
Port | 993 | 587 |
SSL | SSL/TLS | STARTTLS |
Authentication | OAuth2* *If OAuth2 is not listed, click Re-test or Advanced config to get the OAuth2 option to appear. | OAuth2* *If OAuth2 is not listed, click Re-test or Advanced config to get the OAuth2 option to appear. |
Username | Your UT e-mail address | Your UT e-mail address |
4. Click Done.
5. When prompted for multi factor authentication, enter your password and approve the request.
6. Click Accept when at the Permissions requested Window and Finish.
Change auto archive period and move auto archived e-mail to regular mailbox Early 2022 the University of Twente has moved the UT-emailboxes to Microsoft Office 365. One of the consequences is that e-mail older than 2 year is automatically moved to the online archive. This manual describes how to change the auto archive period to "never", and how to move already archived e-mail back to the regular mailbox.
Please note that moving a lot of e-mail can take a while.
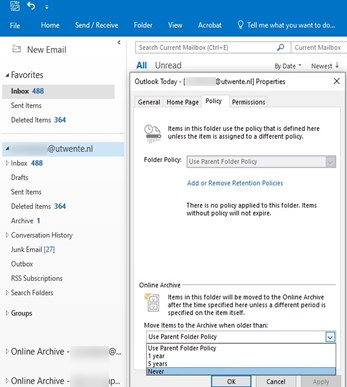
Change the archive policy

- Go to the tab Policy and select the time after which e-mail should be moved to the online archive at Move items to the Archive when older than.
Move the content of the archive back to your mailbox
You can restore the archive in two ways:
- Per Folder (This only works if no folder with the same name already exists.).
- Per content of folder (make sure the folder is already present before you "move").
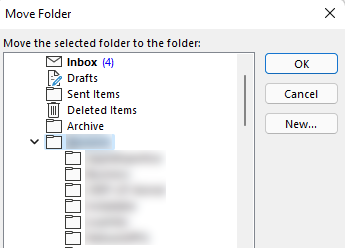
Option 1 (Per folder)
- Right click on the folder you want to restore and select Move Folder.

- Select the parent folder where the archive folder should be moved to and click OK.
Option 2 (Per content of folder):
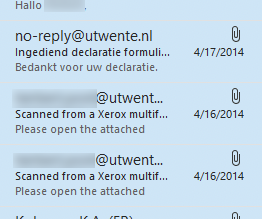
- Select the archive folder whose contents should be restored.

- Click on any e-mail in the folder and press control+a to select all mail in the folder. The selected items turn blue:
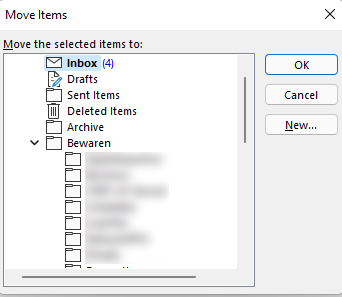
- Right click on any selected e-mail and click: Move > Other folder...

- Select the folder to move the e-mail to and click OK.
Information about Google Apps (former default service for students):
For students who still have access to Google Apps Transfer UT Google account to UT Microsoft account Change IMAP setting (UT) Gmail - Open your Gmail mailbox at: https://mail.google.com/ (login with your @student.utwente.nl account).
- In the top right, click Settings > See all settings.
- Select the Forwarding and POP/IMAP tab. In the IMAP access section, select Enable IMAP. Click Save Changes.
Download and set up Thunderbird with Microsoft 365 account - Download and install Thunderbird from: https://www.thunderbird.net/.
- Enter your name, UT e-mail address and password and click Configure manually.
- Enter the mail server settings:
| Incoming | Outgoing |
Protocol | IMAP | SMTP |
Server | outlook.office365.com | smtp.office365.com |
Port | 993 | 587 |
SSL | SSL/TLS | STARTTLS |
Authentication | OAuth2* *If OAuth2 is not listed, click Re-test or Advanced config to get the OAuth2 option to appear. | OAuth2* *If OAuth2 is not listed, click Re-test or Advanced config to get the OAuth2 option to appear. |
Username | Your UT e-mail address | Your UT e-mail address |
4. Click Done.
5. When prompted for multi factor authentication, enter your password and approve the request.
6. Click Accept when at the Permissions requested Window and Finish.
7. Open the Thunderbird menu in the top right corner and click Account Settings.
8. Rename the Account Name to (for instance) Microsoft 365 and close the Account Settings tab.
Add (UT) Google account to Thunderbird - Open the Thunderbird menu in the top right corner and click Account Settings.
- Click Account Actions and then Add Mail Account.
- Enter your name, UT e-mail address and password and click Configure manually.
- Enter the mail server settings:
| Incoming | Outgoing |
Protocol | IMAP | SMTP |
Server | imap.gmail.com | smtp.gmail.com |
Port | 993 | 587 |
SSL | SSL/TLS | STARTTLS |
Authentication | OAuth2* *If OAuth2 is not listed, click Re-test or Advanced config to get the OAuth2 option to appear. | OAuth2* *If OAuth2 is not listed, click Re-test or Advanced config to get the OAuth2 option to appear. |
Username | Your UT e-mail address | Your UT e-mail address |
5. Click Done.
6. When prompted for multi factor authentication, enter your password and approve the request.
7. Click Allow at the "Mozilla Thunderbird Email wants to access your Google Account" Window and click Finish.
8. You can optionally rename this account to Google in the Account Settings.
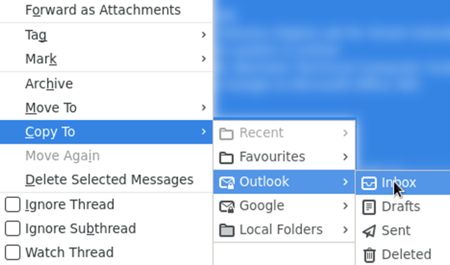
Copy e-mail from the Google environment to the Microsoft environment - On the left side in the Thunderbird window, in the Gmail mailbox, select the folder from which you want to copy e-mail to the Microsoft environment.
- Select the e-mail messages you want to copy and right click on the selection. Hover the mouse over Copy To > Microsoft 365 > Folder (e.g. Inbox). Repeat these steps for the other folders you want to copy.
Transfer (UT) Gmail to Microsoft 365 using Outlook INTRODUCTION
This manual explains how to configure Outlook for Gmail and backup your (UT) Gmail to an Outlook Data file. Creating a backup is optional.
BEFORE YOU GET STARTED
THREE STEPS
Prepare Gmail for connecting to Outlook - Open your Gmail mailbox at: https://mail.google.com/ (login with your @student.utwente.nl account).
- In the top right, click Settings > See all settings.
- Select the Forwarding and POP/IMAP tab. In the IMAP access section, select Enable IMAP. Click Save Changes.
- Go to myaccount.google.com, log in with your @student.utwente.nl account and select Security.
- At Signing in to Google, select App Passwords. You may need to sign in. If you don’t have this option, it might be because 2-Step Verification is not set up for your account.
- If 2-Step Verification is not set up for your account follow these steps first, otherwise go to step 9.
- Enter your phone number and select how you would like to receive the one-time code.
- Enter the Google verification code you received and select Next > Turn On. Click the left arrow to go back to the security menu.
- At signing in to Google, select App Passwords.
- At the bottom, choose Select app and choose Other (custom name). Enter a name (for example: Outlook) and click Generate.
- Copy the generated app password (you need this to configure Outlook). There are no spaces in the password (it is only visible on the screen for readability).
- After you have copied the password, select Done.
Create a Google profile in Outlook - Open the Control panel from the start menu (when you enter control panel in the start menu it will appear in the list) and choose Large icons if necessary.
- Select Mail (Microsoft Outlook).
- Select Show Profiles and click Add in the next window.
- Enter a profile name (e.g. Gmail) and click OK.
- Select Manual setup or additional server types and click Next.
- Select POP or IMAP and click Next.
- Enter the mail server settings:
User Information
Your Name: Your name
Email Address: yourmail@student.utwente.nl |
Server Information
Account Type: IMAP
Incoming mail server: imap.gmail.com
Outgoing mail server (SMTP): smtp.gmail.com |
Logon Information
User Name: yourmail@student.utwente.nl
Password: Enter the previously generated Google app password from Prepare Gmail for connecting to Outlook step 11 here (your own password will not work)
Check Remember password |
8. Select More Settings...
9. Select the Outgoing Server tab and check My outgoing sever (SMTP) requires authentication.
10. Select the Advanced tab and enter the settings as shown below and click OK.

11. Click Next. If the account settings test is completed succesfully click Close and Finish.
12. The Gmail profile is now added. Check the option Prompt for a profile to be used and click OK.
Export and import Outlook data file (.pst) - Start the Outlook application, select the Gmail profile and log in.
- Select Allow in the Microsoft apps & services window.
- Wait until all your e-mail is synced in Outlook. Go to File > Open & Export > Import/Export.
- Select Export to a file and click Next.
- Select Outlook Data File (.pst) and click Next.
- Select your e-mail address (at the very top) and check Include subfolders and click Next.
- Choose a folder to save the Outlook data file in and enter a filename. Click OK and Finish.
- If you wish, you can enter a password to protect the Outlook Data File, or leave blank and select OK.
- Close and restart Outlook and select the Outlook profile (not the Gmail profile).
- Go to File > Open & Export > Import/Export.
- Select Import from another program or file and click Next.
- Select Outlook Data File and click Next.
- Browse to the Outlook data file created in step 7 and select Open. Click Next and Finish.
- In some cases the imported mail is not yet immediately visible. Select the folder where the mail is not visible, select Current View menu and click View Settings.
- Choose Filter, select the Advanced tab and remove the IMAP Status equals Unmarked row and click OK. Repeat for folders in which the e-mail is not visible yet either.
- You can now copy the e-mail you wish to transfer from the Outlook Data File to your mailbox in Outlook.
- Now the Gmail profile can be deleted. Close Outlook and open the Control panel from the start menu (when you enter control panel in the start menu it will appear in the list) and choose Large icons if necessary and open Mail (Microsoft Outlook).
- Click Show Profiles, select the Gmail profile and click Remove. If a warning regarding offline cashed content appears, click Yes.
- Select Always use this profile and click OK.
Import Google Calendar to Outlook Import Google Contacts to Outlook Tranfer Google Drive documents to OneDrive BEFORE YOU GET STARTED
- Documents shared in Google Drive are not shared in OneDrive when transferred.
DOWNLOAD YOUR GOOGLE DRIVE DOCUMENTS
- Open your student e-mail (googleapps.utwente.nl).
- Click on the Menu option in the upper right hand corner and select Account.
- Under the Privacy & personalization section click Manage your data & privacy.
- At the Download or delete your data section select Download you data.
- On the Google Takeout screen select Deselect all.
- Scroll down the list and check the box next to Drive. Scroll down to the bottom of the page and click Next step.
- Leave the default options checked for the Choose file types, frequency & destination option (except for File size if necessary). Click Create export. Google will prepare your files for download. This may take a while depending on how many files you have stored in Google Drive.
- Once the export is complete, select Download to download the .zip file. Save the file to your computer.
- Open the .zip file by either clicking on it from the download window or navigating to where you saved the file. Extract the .zip file and open the folder with the extracted files.
- In a browser, go to portal.office.com and log in with your student account. Select OneDrive from the list of applications.
- Select all the files from Google Drive folder you've downloaded and drag them into OneDrive. The files will begin uploading to OneDrive. This may take a while depending on your connection speed an the amount of files being transferred.
- Once the upload completes you will see the files listed in OneDrive.
FAQ
Where can I download Office 365? You can download Office 365 here: portal.office.com.
This answers my question.
Thank you for your feedback
Where can I find the Office 365 webapps? You can find the Office 365 webapps here: portal.office.com.
This answers my question.
Thank you for your feedback
The url is: https://portal.office.com
This answers my question.
Thank you for your feedback
How can I disable the Focused Inbox view? In Outlook, select the view tab and turn off Show Focused Inbox.
This answers my question.
Thank you for your feedback
What are the IMAP and SMTP settings? Click here for the settings.
This answers my question.
Thank you for your feedback
FAQ about Google Apps (former default service for students):
For students who still have access to Google Apps Google Apps: Until when can I access googleapps.utwente.nl? For current students, the Google Workspace, with all the services, is still available. Content will not be destroyed. This means that services such as Google Drive will still be available.
New students will receive a Microsoft account instead of a Google account.
Google Apps: Can I still receive e-mail during the transfer? Google Apps: After the transfer, I can't receive or send mail on my mobile device. Remove the UT e-mail account on your mobile device and add it again.
Android
- Open your phone's Settings app.
- Tap Accounts. If you don't see "Accounts," tap Users & accounts.
- Tap the account you want to remove > Remove account.
iOS
- From the Home screen, tap Settings > Mail > Accounts.
- Under Accounts, tap on the email account you want to delete.
- Tap Delete Account > Delete from My iPhone.
Google Apps: Why can't I use app specific passwords? The standard way for authentication at the University is Multi-Factor Authentication (MFA), and since the transition to Microsoft 365 this also applies to email. This means that only mail clients that support OAuth2 can be used.
Contact
Last edit: 9 September 2024