Oral exams

Anruf Kunde Unterstützung Frau Silhouette Kopf Gesicht Headset Berater Hilfe Geschäft Linie Kontakt Operator Telefon callback Agent Profil isoliert Der Umsatz Sekretariat Unternehmen Schild Telefon Symbol Internet Bedienung Hände frei Assistent Technologie Feedback Himmel Schriftart Illustration Computer-Tapete Kunst

What do you have to think about if you want to design and take an oral group or individual exam remotely? What types of tools can you use?
On this site you will find guidelines and tips.  

  • What to consider when choosing an oral exam (advantages, disadvantages, considerations, tips...)

    Oral exam

    What

    An oral exam assesses student’s learning based on the spoken word.  Students are asked to use the spoken word, guided by questions or small tasks, to show they have achieved the learning objectives.

    How

    Some consideration, tips and tricks can be found <here>.

    Time

    An oral exam might take you about 30 minutes including preparation and grading.

    Student preparation

    Inform the students explicitly and elaborate about the expected procedure. If possible, let them practice in a (online) lesson. Maybe show a simulated setting in a video to give an impression. Tell them that the oral is meant to provide opportunity to show what they have learned.

    Advantages

    You can test understanding of the topic individually in a reliable way.  Efficient up until 100 students. 

    Disadvantages

    It takes time and it's quite strenuous for the assessor. When using more than one assessor, consider how to guard the inter rater reliability. Do the first few together. Use a clear checklist or rubric.

    Concerns

    A rule in the bachelor EER right now is:  the oral examination is public, unless the Examination Board has determined otherwise in a special case. Is this rule workable in the online situation?

    Ideas, specifics

    An oral exam can be done in small groups. Interaction can be stimulated. 
    An oral exam can also be combined with an assignment, for instance a (group) report.
    A tip by Kristina Edström: reverse the burden of proof.  Ask the students in the first 7 minutes of an oral exam to show you that he/she has reached the learning outcomes. Follow-up questions will then pop up.  Ask students kindly how they think it went after the exam.  Make sure they know they have to show ”real” understanding, in real time.

    Grading, reliability and quality assurance

    Use a grading scale or rubric to stay consistent and fair. A filled in standard form will help to substantiate your judgment in retrospect and upon request. A recording can be considered. The use of two assessors will increase reliability, but this might not always be possible. Assessment might be biased because of assessing pitfalls if the student is not anonymous.  Student’s articulateness, shyness, speed of thought, gender, language skills, etc. can influence the judgment. Keep in mind during the oral exam that a student can be very nervous. Be aware of influencing factors that should not be allowed to contribute to the determination of the grade.

    Point of attention: the first student can pass on the questions to other students. Consider whether this is objectionable and may disadvantage or benefit the earlier, later students. Similar but different question scenarios can be used to overcome this point.

    Tools for online

    Microsoft Teams, Canvas Conference. 
    (See Tools and Techniques below)

    More information & tips

    Step-by-step guide:  – How to design and execute an oral exam.  
    A short guide to oral assessment. Gordon Joughin, 2010. Leeds Metropolitan University/University of Wollongong.  

  • Helpful guides and dos & dont's checklists

    Some helpful guides and checklists 

Videoconferentie

 Tools & Techniques 


Important considerations
  • Most programmes require a second pair of eyes at oral exams. This means either having a second person present, or making a recording.
  • There are privacy regulations around recordings. They should not be available to anyone other than the parties in the recording, and must be removed after a prescribed period of time.

Please keep these considerations in mind while choosing your method below.

  • Create a virtual room and time slots in CANVAS

    The oral exam can be individual or in small groups. They can be organised in two ways:

    1. Create a virtual room and time slots in CANVAS

    Recording

    In case you consider recording for future review, please be aware that all recordings will be available to all people in the Canvas course with a teaching (assistant) role. You should therefore only initiate recordings from your personal Canvas course, not from the general course. You can invite the student(s) to the individual session. Please contact Canvas support if you have any questions about this.

    If you want to ask students from your (personal) Canvas course to sign up for exam timeslots, it is best to add the students and then use the Scheduler function in Canvas.

    1. Create a Scheduler appointment group in a course calendar (links to an external website).

    2. After students sign in you can view (or edit) the appointment group
    3. When all students have signed up, create a Canvas conference. Select ‘No time limit’. Under ‘Members’ select the students who have signed up.
    4. To let students know where the meeting is, put the link of the conference in the ‘Location’ or ‘Details’ field of the Appointment group. You can copy the link of the conference by right clicking on the Start button of the conference, and then select ‘copy link location’.
    5. Start the conference at the time of the first time slot. After that, students can join the conference. Do not end the conference (by clicking End meeting in the conference or End on the Canvas page) before all invited students have taken their exam. 
    Tip!

    If you inform your students about the Appointment group with an Announcement you can also include a link to the Canvas guide that explains how they can sign up.

    Pros: As a lecturer you can stay in the same room at all times, students have their own responsibility to join at the designated time slot
    Cons: The room is open with a link. Students are also able to join the room when other students are having their oral exam. If you have small number of students you could create separate conferences for each student individually to prevent this from happening.

    2. Create a signup list and call an individual student

    Call individual students or let the students call you. As a signup tool, you could consider using Planzelf. This tool allows students to schedule a block of time in a designated period in your Outlook calendar.

    For tips on how to design and conduct an oral exam, see the Helpful guides and checklists

    We strongly recommend using a good quality headset. If you do not own one, you can request one here (home delivery is possible).

  • Using MS Teams to set up and record individual or group meetings
    Recording

    In case you consider recording for future review, the lecturer should make a direct (video) call or schedule a Teams meeting to the student. This way, only the participants will be able to view the recording.

    Note: If the call is set up as part of a shared team, all team members will be able to see the recording. This is not allowed under privacy regulations.

    MS Teams can be used to set up a meeting (with an individual or group) and record a meeting.

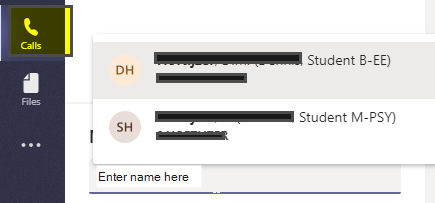
    Simply click the Calls button on the left side of the screen, and enter the last name of the student (and any other people on the call, such as a second examiner).

    Please refer to the instructions on the MS Teams support pages: 
    >> Meetings and calls 

    If you want to save the recording, please do so on a shared drive maintained by your programme. This will allow the programme staff to regularly delete recordings, per privacy regulations. Please see the following tnstructions on the MS Teams support pages: 
    >> Downloading a meeting recording